Hanging a heavy mirror or TV on the wall with just drywall anchors is like playing Russian roulette with your furniture. Plasterboard is fragile. It won’t hold too much weight. To attach things to the wall and keep the wall intact, you need to attach it to the wooden frame behind the plaster. In particular, you need to find the studs.
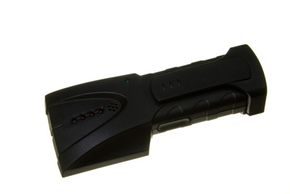
The tool that makes this possible is the stud finder. Turn invisible guessing games into precise actions.
Practical use of this tool
The core of the stud finder is a battery-operated electromagnetic detector. It detects changes in the material density of the wall. Most modern devices flash an LED or emit a signal when they detect a shift. This change usually occurs when the probe passes over the wood frame.
This device can also detect metals. Identifies the nails and screws that attach the drywall to the studs. This is a side benefit. The main purpose is to locate vertical wooden beams.
Step by step: how to locate a stud
You need a steady hand to get accurate readings. This is the process.
- Prepare the equipment. Check the battery. Wipe the back of the finder with a clean cloth. Dust and debris can interfere with the sensor’s ability to read the density of the walls.
- Turn on the power. Press and hold the side buttons according to the manufacturer’s instructions. Wait for the device to calibrate. This usually takes a few seconds.
- **Scan the wall. ** Place the finder flat against the surface. Slide horizontally. Move slowly.
- ** Watch the lights. ** If the LED light intensity changes or flashes, you are over a stud.
- ** Mark the center. ** Use a pencil to mark on the wall. This is your guide.
The standard distance between studs in most residential buildings is 16 inches or 24 inches. Once you’ve marked one stud, you can estimate the location of the next one by measuring these distances. However, don’t trust the estimate blindly.
Why Double-Check is necessary
Stud finders are useful, but not foolproof. They can pick up other things behind the wall. Plumbing pipes. Electrical wiring. Even large amounts of insulation can cause false positive in some cases.
Check your findings to avoid drilling into Plumbing pipess. Find two or more studs. Check if they align the standard spacing. If readings are erratic, try moving to another part of the wall. Consistency is the only reliable signal.
Alternative methods and tools
You don’t necessarily need an electronic device to locate a stud, but it can help. A soft-tipped hammer is a classic backup tool. Tap the wall. Listen to the sound.
A strong “thud” means wood. A hollow “click” or “ping” sound indicates that there is free space between studs. This method requires experience. Not as accurate as a digital finder. It’s also slower.
Keep your tools in order. A clean sensor and a new battery are the difference between a clean cut and a ruineded wall. If you don’t know where the pins are, don’t guess. Misplaced drill holes are difficult to repair.
Preparation is required to safely hang items. Find the wood. Mark it clearly. Drill with confidence. The rest follows.