Stop waiting for a plumber. If your toilet wobbles or you spot water pooling at the base, you are looking at a blown wax ring. This is one of those rare DIY jobs where the barrier to entry is low, but the payoff is huge. You aren’t just saving money on service calls. You are preventing the rot that turns subflooring into mush.
The culprit is the wax ring seal. It sits between the toilet’s horn and the floor flange. When it fails, waste water escapes. The fix is cheap. The materials cost less than a tank of gas. You just need to act before the wood underneath rots.
Why Temperature Matters
There is a catch. The wax needs to be pliable. If you try to install this in a cold bathroom, the ring will shatter. It won’t seal. It will crack and leak immediately.
Keep the room temperature at least 70 degrees Fahrenheit. Warm wax molds to the imperfections in the flange. Cold wax is brittle. It breaks under pressure. If it’s a chilly day, run the heater or wait. Do not force a cold installation.
Replacing the Seal on an Existing Toilet
If your toilet is already installed and leaking, you are in Part 1. You need to remove the bowl to get to the ring.
- Cut the water. Find the shut-off valve near the floor or behind the toilet. Turn it clockwise until it stops. If the valve is rusted shut, you might need to go into the crawl space or basement to kill the main line.
- Drain the tank. Flush the toilet once or twice. The tank should empty. The bowl will still have water in it.
- Sponge it out. Use a dedicated sponge or wet/dry vac to remove the remaining water from the bowl. You do not want sewage water on your bathroom floor.
- Disconnect the line. Unbolt the water supply line from the bottom of the tank.
- Remove the base caps. Pry off the plastic caps covering the bolts at the base of the toilet.
- Loosen the nuts. These nuts hold the toilet to the flange. They can be stubborn. Use penetrating oil if they are seized. Pliers or a wrench will work.
- Rock and roll. Grip the bowl, not the tank. Rock it gently side to side. This breaks the caulk and the old wax seal. Do not lift by the tank. The porcelain is brittle. You will crack the connection between the tank and bowl if you lever it incorrectly.
- Lift and discard. Set the toilet aside on old towels. Scrape the old wax off both the flange and the toilet horn. Clean surfaces are essential for the new seal.
Now you are ready for Part 2.
Installing the New Wax Ring
You have the new ring. It costs about five dollars. It is the most important part of the job.
- Prep the flange. Make sure the flange is clean and dry. Check the bolts. They should be upright and secure. If they are broken, you need a repair flange.
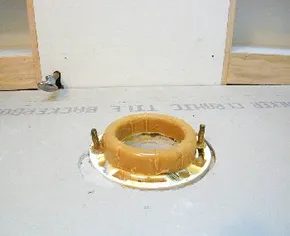
- Position the ring. Unwrap the wax ring. Place it over the flange. The round, flat side goes up. The tapered or funnel side goes down into the flange. Center it perfectly. If it is off-center, it will leak.
- Lower the toilet. Lift the toilet straight up. Do not tilt it. Lower it directly onto the flange. You need to drive the horn into the wax.
- Seat the toilet. Sit on the toilet. Your weight helps press the wax into a tight seal. Wiggle slightly to ensure it is level.
- Secure the bolts. Place the washers and nuts back on. Tighten them by hand first. Then use a wrench, but stop before you overtighten. Cracking the porcelain base is a common mistake. If you crank too hard, the toilet cracks. You will have to start over.
- Reconnect the water. Hook the supply line back up.
- Fill slowly. Turn the water on halfway. Let the tank fill slowly. This prevents thermal shock to the porcelain and avoids the “shower surprise” if someone else is using the bathroom. A sudden drop in cold water pressure can scald someone in the shower. It is a real risk.
- Test for leaks. Flush. Look under the toilet. Look at the water line connection. If you see water, you have a leak. Tighten the nuts slightly. If it still leaks, the wax seal is compromised. You must remove the toilet and try again with a fresh ring.
- Caulk the base. Apply silicone caulk around the