Your washer has a gearbox. It is the central nervous system of the laundry process. Most people don’t look at it. They just toss in clothes. They push start. They wait for clean socks. But inside that metal box, gears are grinding. They are translating rotation into agitation. They are forcing water out through sheer centrifugal force.
Think about the two jobs this machine must do.
First, it has to agitate. That means moving clothes back and forth. You want the fabrics to slap against each other. Detergent needs to penetrate fibers.
Second, it has to spin. The tub rotates at high speed. Water flies off the clothes. The cycle ends faster because the mechanics work efficiently.
One gearbox handles both tasks. It uses a clever trick. The direction of the motor’s spin dictates the outcome.
Spin one way. The gearbox engages agitation mode.
Spin the other way. The gearbox shifts into spin cycle.
This is how a washing machine drive mechanism works without complex electronic switching for every gear. The motor just changes direction. The gearbox interprets that change. Simple physics. Effective engineering.
The setup is straightforward once you strip away the outer shell.
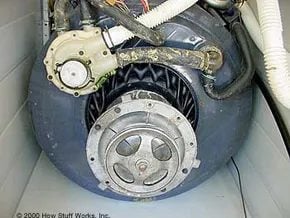
Picture the frame removed. You see the pump mounted directly to the outer tub. It handles drainage. It sits quietly until needed.
Then there is the gearbox. This component holds the inner tub. It bears the weight of wet clothes. It takes the abuse of rapid rotation.
Between these two components lies a critical seal.
A piece of rubber separates the outer tub from the gearbox. This seal is everything. It keeps water out of the gear assembly. If that rubber fails, the gearbox fills with soapy water. Gears rust. Plastic parts dissolve. The machine dies.
The inner tub mounts to the gearbox on the other side of that seal. It rotates freely when the spin cycle engages. It wobbles slightly during agitation.
You might wonder why this design persists. Electronic direct drives exist. They are quieter. They are more efficient. They lack the belt and pulley system.
But this setup? It is reliable. It is serviceable. You can replace the seal. You can replace the gearbox. You can keep the machine running for decades.
When was the last time you opened your washer? Not just the door. The back panel. The top deck.
Most homeowners never see the drive mechanism. They only see the results. Clean clothes. Dry clothes.
If you are planning a repair, start with the seal. Inspect the rubber. Look for cracks. Look for sludge.
The pump is easy to access. The gearbox is buried deeper. But understanding the layout helps.
Know where the water goes. Know where the rotation happens.
This knowledge turns a mysterious appliance into a simple machine. You are not fighting it. You are working with its design.
Next time you hear the motor change direction, listen closely. That is the gearbox shifting gears. It is doing exactly what it was built to do.
Agitate.
Spin.
Repeat.
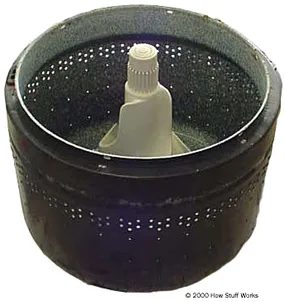
The Agitator and Gearbox Reveal
Now that you have pulled the inner tub out of the outer shell, take a look down. It’s sitting on top of the gearbox assembly. You can see the plastic agitator right in the middle of the tub.
This is the part that twists during the wash cycle. If it looks cracked or the teeth are stripped, the motor will spin, but the clothes won’t move.
Check the agitator for cracks before reassembly. A broken plastic part will make noise and stop the machine from cleaning.
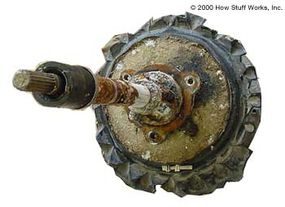
Inspecting the Top Assembly
With the seal sliced open and the inner tub pulled out, you’re looking at the top of the gearbox. The tub bolts directly into three holes in the flange. Take a look at the crust buildup on the housing. That grime is proof of years of wash water exposure. Water got in. It stayed in.
A hollow tube runs from the center of the unit. Inside that tube sits a splined shaft. The top spline is what locks into the plastic agitator. If that shaft is worn, your clothes aren’t getting turned. Check the splines for rounding. They need to be sharp.